Solar Water Heater
Before starting on our tiny house, the class built solar water heaters that helped us better understand how heating is used in solar energy. We could use plastic tubing, soft copper tubing, water container, insulation, aluminum foil, cardboard, and plastic sheet.
Materials;
Cardboard - holds heat together
Plastic tubing- water exist/enters
Copper tubing- for convention and conducting purposes
Mirrors- used for reflecting
To make our Solar Water Heater we had to calculate the angle of the mirrors and then place them on a piece of wood. They were at 50 and 75 degree angle. Then we would run a copper tube through the middle so the sun would hit it. We had a water bottle filled with water and was attached to plastic tubing then was attached to the copper tubing and then was held in there for about 30 mins. Overall, our design heat gain was 502.32 J

Day Lighting Techniques and Experimental House
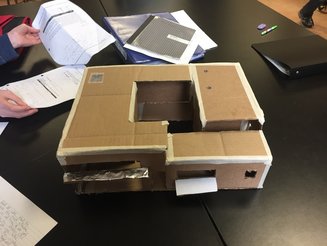
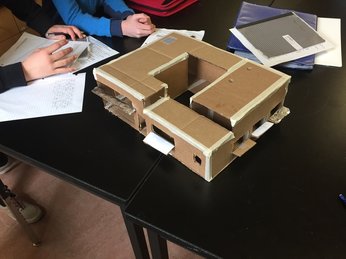
To understand the day lighting techniques better we designed and built a model. The model was made out of cardboard and was used to get us a better understanding of how to light up our house by only using natural light.
Techniques:
Solar Tubes= tubes in the ceiling that distribute natural light through reflecting it internally
Light Shelves= horizontal surface to reflect light onto the ceiling, then onto the floor
Clerestory Window= short window close to ceiling that lets light in by reflecting light onto the opposite wall and then onto the floor
Skylight= glass "window" in ceiling that lets direct light in
We put in a court yard and in the master bedroom there is a light shelve and a window. In the first bedroom there is a clerestory light shelve and in second bedroom there is a light shelve and a solar tube and lastly, in third bedroom there is a light shelve, solar tube, and window. In the living room there was a clear store window, a glass window, and a light shelve. In the kitchen there is a glass window and lastly, in dining room there is a sky light and a window.
|
|
Material Heat Lab
The class designed an experiment to see certain materials reacting to heat. The class got together and discussed how it would all happen and then broke off into smaller groups. We designed this experiment because we wanted to know how different material reacted to heat (reflecting or holding it in).
The Experiment:
1. Place the material 40 cm underneath a 125-watt heat lamp.
2. Measure the initial temperature of the material at the center of the surface facing upwards, towards the lamp.
3. Turn lamp on.
4. Measure the temperature of the material (at the center of the surface) after 5 minutes.
5. Measure the temperature of the material in the same spot after an additional 5 minutes (10 minutes from the start).
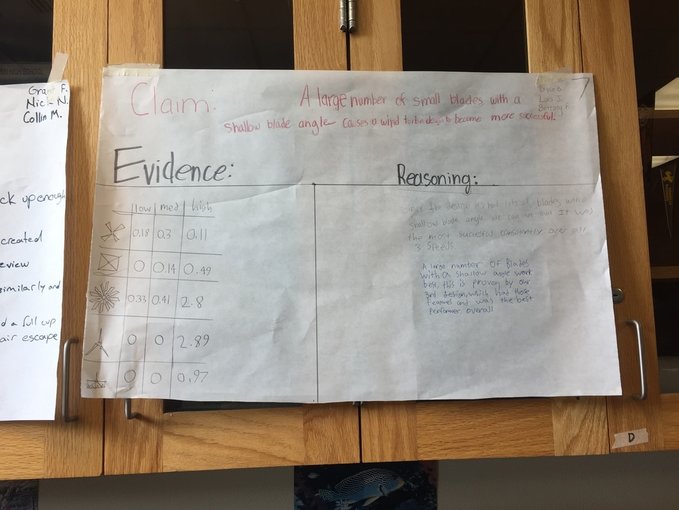
Wind Turbine Design
Our group designed, different wind blades that respond to different wind settings. We used a small fan for the low and medium setting. And for the high setting we used a leaf blower. We tested each of the sets of fan blades on a horizontal and vertical axis. All of us helped each other design different types of blades and some of them didn't out as well as we thought but it helped us better understand how turbines work.
Tiny House
All the work that lead up to this helped us better understand how to build a house that doesn't used a lot of energy. The driving question was: How can we design a home that is comfortable in all conditions without the use of electricity? With the knowledge we have, we can use it to decide on how the tiny house would work and the materials to help build it. We started by finding a place to put the tiny house and then started to blue print. We blue printed the wall and ceiling. Also, some day lighting techniques we used were a glass window and a clerestory window. We also had a brick wall so that when the sun rises the rays will hit the brick wall which holds the heat and then slowly releases it during the night. Then, we started the materials list and then did the presentation.
All the work that lead up to this helped us better understand how to build a house that doesn't used a lot of energy. The driving question was: How can we design a home that is comfortable in all conditions without the use of electricity? With the knowledge we have, we can use it to decide on how the tiny house would work and the materials to help build it. We started by finding a place to put the tiny house and then started to blue print. We blue printed the wall and ceiling. Also, some day lighting techniques we used were a glass window and a clerestory window. We also had a brick wall so that when the sun rises the rays will hit the brick wall which holds the heat and then slowly releases it during the night. Then, we started the materials list and then did the presentation.
| tiny_house_materials.ods |
Reflection:
Our group split up and worked on different areas of the project. I worked on the materials list and Bryce worked on the blueprinting, Luis worked on the 3d modeling and lastly, Tyler did the floor plan. We all did our little things and at the end we put it all together. Since some people were absence some days we were rushing to get things done. I learned that I need to be more of a leader when people are not hear and to make sure things get done so we wouldn't have to rush. Also, I did well on doing my part of the project. We could of worked on time management because we were also missing a bunch of little details in our presentation. Overall, it was a good project and as a group we work well.
I worked on this project with Bryce Bernales, Tyler Marvier, Luis Jasper.
